

CRM64Pro Tutorial 16.6
Scene Lighting.
Build a TMX-driven Scene with animated lights, occluder shadows, and small fire particle effects.
Final result
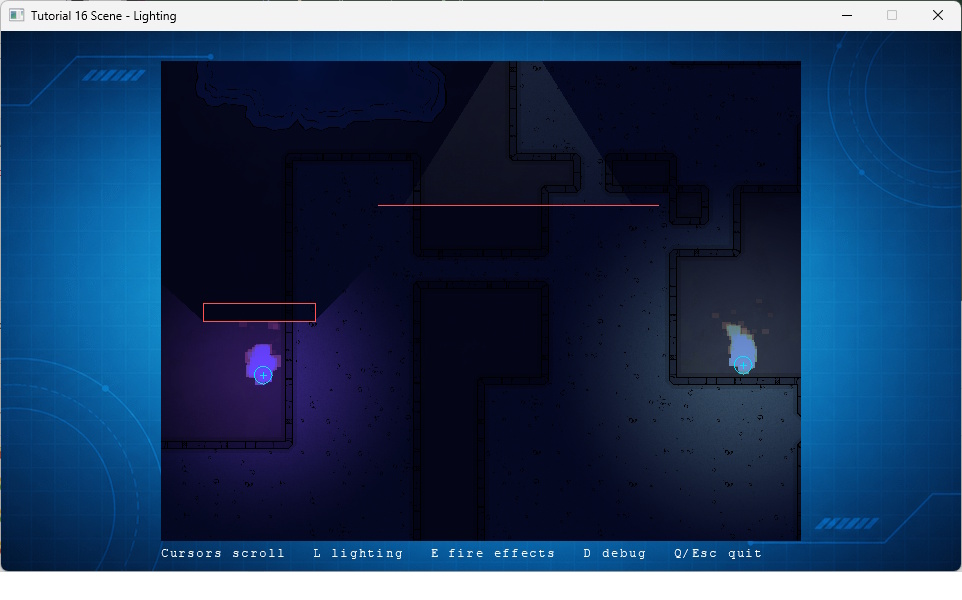
L toggles Scene lighting; E toggles Scene fire effects; D toggles light, occluder and particle shapes; cursor keys scroll the Scene; and Q or ESC exits.
Prerequisites
- CRM64Pro GDK installed and configured with a supported C++17 compiler.
- Tutorial package downloaded and fully extracted, preserving its folder structure.
- Understand TMX object layers from earlier Scene tutorials.
- Included assets available under
bin/Base/:map-ddraft1.png,lighting.tmx. - Keep
Tutorial_bginTutorial.cdc.
What you will learn
- Enable ambient Scene lighting from TMX properties.
- Configure candle, pulse, and spotlight
C64Lightobjects. - Cast shadows with
C64Occludergeometry. - Attach a built-in
FIREpreset toC64Particleobjects. - Toggle lighting and particles independently.
Step 1: Enable the two Scene systems
The map enables lighting and particle effects separately. Ambient color and intensity darken the scene before individual lights are added.
<properties>
 <property name="c64scn_version" type="int" value="40"/>
 <property name="c64scn_lighting_ambient" type="color" value="#182238FF"/>
 <property name="c64scn_lighting_ambient_intensity" type="float" value="0.28"/>
 <property name="c64scn_lighting_enabled" type="bool" value="true"/>
 <property name="c64scn_effects_enabled" type="bool" value="true"/>
</properties>
Important: c64scn_version is required for a native CRM64Pro Scene. Without it, the map loads as generic TMX and its c64scn_* properties, including ambient lighting and the initial lighting/effects states, are ignored.
c64scn_effects_enabled only controls C64Particle objects. Animated lights remain part of the lighting system.
Step 2: Create an animated candle
The object ID supplies deterministic variation. The candle animation changes intensity, radius, and color without per-frame application code.
<object id="1" name="Candle" type="C64Light" x="230" y="410">
 <properties>
  <property name="c64scn_light_range_px" type="float" value="190"/>
  <property name="c64scn_light_intensity" type="float" value="1.0"/>
  <property name="c64scn_light_color" type="color" value="#FFF0B0FF"/>
  <property name="c64scn_light_shadows" type="bool" value="true"/>
  <property name="c64scn_light_animation" value="candle"/>
  <property name="c64scn_light_animation_rate" type="float" value="8"/>
  <property name="c64scn_light_animation_amount" type="float" value="0.32"/>
  <property name="c64scn_light_animation_radius_amount" type="float" value="0.12"/>
  <property name="c64scn_light_secondary_color" type="color" value="#E85018FF"/>
 </properties>
</object>
The second light uses pulse, so you can compare a smooth color transition with irregular candle variation.
Step 3: Cast a spotlight shadow
An angle between 0 and 360 makes a spotlight. Its Tiled rotation gives its direction; the polyline below it blocks its light and casts the visible shadow.
<object id="3" name="Spotlight" type="C64Light" x="485" y="58" rotation="90">
 <properties>
  <property name="c64scn_light_range_px" type="float" value="390"/>
  <property name="c64scn_light_intensity" type="float" value="0.25"/>
  <property name="c64scn_light_color" type="color" value="#B8D8FFFF"/>
  <property name="c64scn_light_shadows" type="bool" value="true"/>
  <property name="c64scn_light_angle_deg" type="float" value="64"/>
 </properties>
</object>
<object id="4" name="Spotlight wall" type="C64Occluder" x="345" y="240">
 <properties>
  <property name="c64scn_occludes_light" type="bool" value="true"/>
 </properties>
 <polyline points="0,0 280,0"/>
</object>
Disable c64scn_light_shadows on a light when the visual does not need an occlusion pass. The pulse light does this in the tutorial.
Step 4: Add fire as a Scene particle
Each C64Particle object owns its emitter. A named built-in preset avoids a separate particle asset for this small effect.
<object id="6" name="Candle fire" type="C64Particle" x="230" y="410">
 <properties>
  <property name="c64scn_particle_preset" value="FIRE"/>
  <property name="c64scn_particle_autoplay" type="bool" value="true"/>
 </properties>
</object>
The particle remains independent of the candle light: E pauses and hides fire, while L only enables or disables the lightmap.
Step 5: Load the TMX and enable layers
The code uses the regular Scene loader. The map owns its lighting values; the application sets the viewport, enables smooth rendering layers, and explicitly starts lighting and particle effects.
const Sint32 idScene = mC64.sceneMgr().loadFromFile(BASEDIR "lighting.tmx");
g_pState->pScene = mC64.sceneMgr().get(idScene);
if(!g_pState->pScene) return false;

SDL_Rect rViewport = { iViewX, iViewY, iViewW, iViewH };
if(!g_pState->pScene->setViewport(&rViewport)
    || !g_pState->pScene->setLayerFeatures(1, SLF_RENDER, true)
    || !g_pState->pScene->setLayerFeatures(2, SLF_UPDATE | SLF_RENDER, true)
    || !g_pState->pScene->setLayerFeatures(1, SLF_SMOOTHSCROLL, true)
    || !g_pState->pScene->setLayerFeatures(2, SLF_SMOOTHSCROLL, true)) return false;
g_pState->pScene->setLightingEnabled(true);
g_pState->pScene->setEffectsEnabled(true);
Step 6: Toggle lighting and particles separately
Lighting, fire effects, and debug shapes start enabled. The runtime controls intentionally use separate Scene switches, which makes the two systems easy to diagnose and offers a simple quality setting.
else if(Event.key.key == SDLK_L)
{
    const bool bEnabled = !State.pScene->isLightingEnabled();
    State.pScene->setLightingEnabled(bEnabled);
    pLog->msg(LL_INFO, "Lighting: %s\n", bEnabled ? "ON" : "OFF");
}
else if(Event.key.key == SDLK_E)
{
    const bool bEnabled = !State.pScene->isEffectsEnabled();
    State.pScene->setEffectsEnabled(bEnabled);
    pLog->msg(LL_INFO, "Fire effects: %s\n", bEnabled ? "ON" : "OFF");
}
Complete source
- View Tutorial_16_Scene_Lighting.cpp
- Tutorial 11: Lightmap for direct GFX lightmap control.
- Tutorial 10: Particles for standalone emitters and presets.
Previous tutorial
Combine terrain costs, pathfinding and fog of war.
Tutorial index
Next tutorial
This is the last tutorial in the series.