

CRM64Pro Tutorial 11
2D lightmaps.
Combine ambient light, animated point lights, a spotlight, and three occluder shapes in one lightmap pass.
Overview
This tutorial introduces the GFX 2D lighting pass. It draws the scene first, then builds and applies a lightmap from ambient color, three light types, and optional rectangle, circle and segment occluders.
The lights demonstrate candle animation, a mouse-controlled point light, and a spotlight placed above the segment so its shadow is visible.
Final result
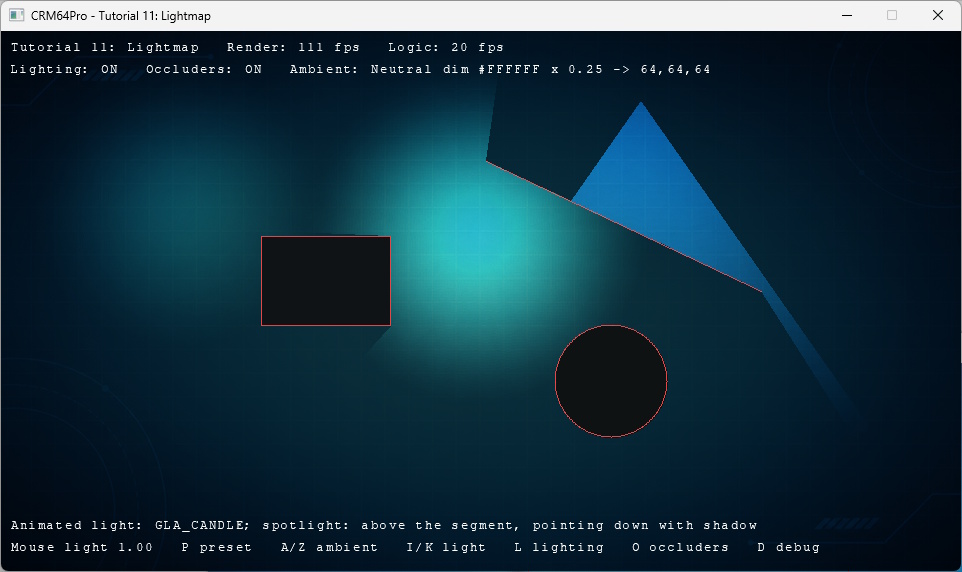
The mouse moves the warm light; L toggles lighting; O toggles occluders; P cycles ambient presets; A/Z changes ambient intensity; I/K changes mouse-light intensity; D toggles debug; grave toggles the console; and Q or ESC exits.
Prerequisites
- CRM64Pro GDK installed and configured with a supported C++17 compiler.
- Tutorial package downloaded and fully extracted, preserving its folder structure.
- Run Tutorials 02 and 04 so
Tutorial.cdccontains the background and cursor. - A renderer supported by the GFX lightmap implementation.
What you will learn
- Begin and finish a GFX lightmap pass.
- Add rectangle, circle and segment occluders.
- Configure point and spot lights with
GFXLight. - Animate light color, intensity and radius.
- Always finish an active pass after intermediate failures.
- Keep diagnostics and HUD rendering outside lighting.
Step by step
Step 1: Define ambient presets
Each preset combines a base RGB color with its recommended starting intensity.
static const AmbientPreset vAmbientPresets[] =
{
    { "Daylight",      255, 255, 255, 1.00f },
    { "Neutral dim",   255, 255, 255, 0.25f },
    { "Dusk",          154, 168, 200, 0.45f },
    { "Moonlight",     113, 136, 184, 0.20f },
    { "Warm interior", 208, 144,  88, 0.20f },
    { "Torch",          58,  32,   8, 0.08f },
    { "Blackout",        0,   0,   0, 0.00f }
};
Step 2: Convert ambient values safely
Clamp and round each floating-point color result before passing it to beginLighting().
// Convert a light value to a valid colour byte.
static Uint8 lightByte(float fValue)
{
    if(fValue <= 0.0f) return 0;
    if(fValue >= 255.0f) return 255;
    return static_cast<Uint8>(fValue + 0.5f);
}
Step 3: Draw the scene before lighting
These normal scene shapes are rendered before the lightmap is accumulated.
// Draw the scene objects lit by the lightmap.
static void renderSceneProps(GFX& mGFX)
{
    mGFX.rectFilled(260, 205, 390, 295, 62, 76, 88, 255);
    mGFX.rect(260, 205, 390, 295, 210, 220, 230, 255);
    mGFX.circleFilled(610, 350, 56, 56, 72, 74, 255);
    mGFX.circle(610, 350, 56, 210, 220, 230, 255);
    mGFX.line(485, 130, 760, 260, 210, 220, 230, 255);
}
Step 4: Begin with ambient light
When lighting is enabled, begin the lightmap with the selected ambient color and intensity.
if(!rState.bLighting) return true;

const AmbientPreset& Ambient = vAmbientPresets[rState.iAmbientPreset];
bool bOk = mGFX.beginLighting(lightByte(Ambient.iR * rState.fAmbientIntensity),
    lightByte(Ambient.iG * rState.fAmbientIntensity), lightByte(Ambient.iB * rState.fAmbientIntensity));
if(!bOk) return false;
Step 5: Add matching occluders
The occluder geometry matches the visible scene shapes. Results accumulate without skipping later cleanup.
if(rState.bOccluders)
{
    bOk = mGFX.addLightOccluderRect(260, 205, 390, 295) && bOk;
    bOk = mGFX.addLightOccluderCircle(610, 350, 56) && bOk;
    bOk = mGFX.addLightOccluderSegment(485, 130, 760, 260) && bOk;
}
Step 6: Configure an animated candle
GLA_CANDLE varies intensity, blends toward a secondary color, and changes radius using a stable animation ID.
GFXLight CandleLight;
CandleLight.fX = 175.0f;
CandleLight.fY = 170.0f;
CandleLight.fRadius = 165.0f;
CandleLight.iColor = 0xFFF0B0FF;
CandleLight.fIntensity = 0.52f;
CandleLight.bUseOccluders = rState.bOccluders;
CandleLight.eAnimation = GLA_CANDLE;
CandleLight.fAnimationRate = 8.0f;
CandleLight.fAnimationAmount = 0.32f;
CandleLight.iSecondaryColor = 0xE85018FF;
CandleLight.fAnimationRadiusAmount = 0.10f;
CandleLight.iAnimationID = 1;
bOk = mGFX.drawLight(CandleLight) && bOk;
Step 7: Add a mouse-controlled point light
The second light follows the cursor and exposes its intensity through runtime controls.
GFXLight MouseLight;
MouseLight.fX = rState.fMouseX;
MouseLight.fY = rState.fMouseY;
MouseLight.fRadius = 180.0f;
MouseLight.iColor = 0xFFDCA0FF;
MouseLight.fIntensity = rState.fMouseIntensity;
MouseLight.bUseOccluders = rState.bOccluders;
bOk = mGFX.drawLight(MouseLight) && bOk;
Step 8: Add a spotlight and finish
The downward 70-degree cone crosses the segment occluder. endLighting() always runs after a successful begin.
GFXLight SpotLight;
SpotLight.fX = 640.0f;
SpotLight.fY = 70.0f;
SpotLight.fRadius = 430.0f;
SpotLight.fDirection = 90.0f;
SpotLight.fAngle = 70.0f;
SpotLight.iColor = 0xB0D8FFFF;
SpotLight.fIntensity = 0.65f;
SpotLight.bUseOccluders = rState.bOccluders;
bOk = mGFX.drawLight(SpotLight) && bOk;
bOk = mGFX.endLighting() && bOk;
return bOk;
Step 9: Keep diagnostics outside the pass
After applying lighting, draw any failure notice, occluder outlines, and the HUD.
if(!renderLighting(mGFX, rState))
{
    mGFX.rectFilled(10, 58, 330, 78, 160, 0, 0, 220);
    renderText(pFont, 14, 60, "Lightmap pass failed");
}

if(rState.bOccluders)
{
    mGFX.rect(260, 205, 390, 295, 255, 80, 80, 210);
    mGFX.circle(610, 350, 56, 255, 80, 80, 210);
    mGFX.line(485, 130, 760, 260, 255, 80, 80, 210);
}

renderHUD(pFont, rState);
Step 10: Change ambient intensity
Cycle presets or adjust the active ambient intensity within the 0.0-1.0 range.
else if(event.key.key == SDLK_P)
{
    state.iAmbientPreset = (state.iAmbientPreset + 1) % iAmbientPresetCount;
    state.fAmbientIntensity = vAmbientPresets[state.iAmbientPreset].fIntensity;
}
else if(event.key.key == SDLK_A)
{
    state.fAmbientIntensity += 0.05f;
    if(state.fAmbientIntensity > 1.0f) state.fAmbientIntensity = 1.0f;
}
else if(event.key.key == SDLK_Z)
{
    state.fAmbientIntensity -= 0.05f;
    if(state.fAmbientIntensity < 0.0f) state.fAmbientIntensity = 0.0f;
}
Step 11: Select the cursor and finish cleanly
Use the existing cursor hotspot, and exit before another state update after quitting.
mLog.msg(LL_INFO, "  Select cursor ... ");
if(mC64.cursorMgr().select(state.idCursor) < 0 || !mC64.cursorMgr().show())
{
    logTaskFailed(mLog);
    Main::terminate();
    return -1;
}
logTaskOk(mLog);
if(!bRunning) break;
state.fMouseX = mC64.cursorMgr().getX();
state.fMouseY = mC64.cursorMgr().getY();
state.iCurrentRenderRate = static_cast<Sint32>(mC64.timer().getCurrentRFR());
state.iCurrentLogicRate = static_cast<Sint32>(mC64.timer().getCurrentLFR());
updateLogic(state);Complete source
Use the source file as the authoritative version of this tutorial.
- View Tutorial_11_Lightmap.cpp
- Input archive:
Tutorial.cdc - Lighting API:
GFXLight,GFX::beginLighting(),GFX::endLighting() - Log:
Tutorial_11_Lightmap.log
Tutorial index