

CRM64Pro Tutorial 04
Custom cursor.
Add a cursor and its image to the Tutorial 02 CDC archive, load it by name and use it as the application pointer.
Overview
This tutorial extends Tutorial 02 with a custom mouse cursor. Tutorial 02 creates Tutorial.cdc with the background and ship images. Tutorial 04 opens that archive, adds a cursor and its owned image, then loads every runtime resource from the CDC.
The render callback, fixed-rate movement, debug window and console remain unchanged so the new code stays focused on Cursor and CursorMgr.
Final result
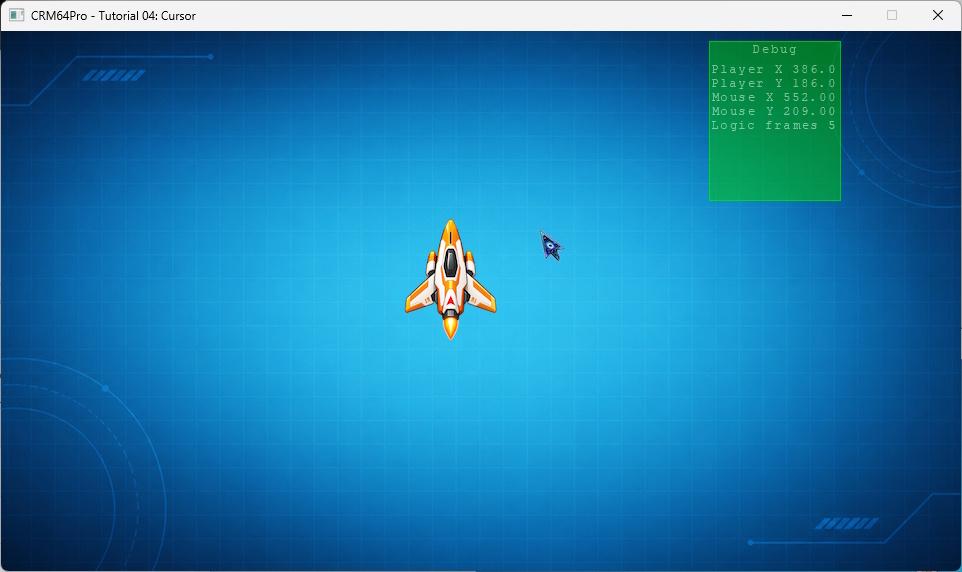
Cursor keys move the ship, D toggles the debug window, grave (`) toggles the console, any key or mouse click is logged, and Q or ESC exits.
Prerequisites
- CRM64Pro GDK installed and configured with a supported C++17 compiler.
- Tutorial package downloaded and fully extracted, preserving its folder structure.
- Run Tutorial 02 first to create
Tutorial.cdcwithTutorial_bgandTutorial_ship. - Included assets available under
bin/Base/:tutorial_cursor.png. - Write access to the platform output directory.
What you will learn
- How to add a cursor resource to an existing CDC archive.
- How to create a
Cursorand assign anImageto it. - How to transfer image ownership to a cursor.
- How to load cursor and image resources from a CDC archive.
- How to set the hotspot, select the cursor and make it visible.
Step by step
Step 1: Verify the Tutorial 02 archive
Tutorial 04 adds a resource instead of creating a new archive. Checking the prerequisite first prevents an incomplete cursor-only CDC from being created when Tutorial 02 has not been run.
// Tutorial 04 introduces one new resource. Tutorial 02 already created
// the CDC with the background and ship.
mLog.msg(LL_INFO, "  Find Tutorial 02 CDC: %s ... ", OUTPUT_CDC);
if(!mC64.tool().fileExists(OUTPUT_CDC))
{
    logTaskFailed(mLog);
    return false;
}
logTaskOk(mLog);
Step 2: Load the cursor image
The cursor starts as a normal PNG loaded through ImageMgr. Both the returned ID and borrowed image pointer are checked before creating the cursor.
mLog.msg(LL_INFO, "  Load cursor image: %s ... ", RESOURCE_CURSOR_IMAGE);
Sint32 idCursorImage = mC64.imageMgr().loadFromFile(RESOURCE_CURSOR_IMAGE, "tutorialCursorImageFile");
Image* pCursorImage = mC64.imageMgr().get(idCursorImage);
if(idCursorImage < 0 || pCursorImage == nullptr)
{
    logTaskFailed(mLog, idCursorImage);
    return false;
}
logTaskOk(mLog);
Step 3: Create the cursor and assign its image
CursorMgr::create() returns an empty cursor. Passing 1 to assignImage() transfers ownership of the loaded image to that cursor. Closing the cursor will therefore also close its owned image.
mLog.msg(LL_INFO, "  Create cursor from image ... ");
Sint32 idCursorFile = mC64.cursorMgr().create(RESOURCE_CURSOR_CDC_NAME);
Cursor* pCursorFile = mC64.cursorMgr().get(idCursorFile);
if(idCursorFile < 0 || pCursorFile == nullptr)
{
    logTaskFailed(mLog, idCursorFile);
    mC64.imageMgr().close(idCursorImage);
    return false;
}
if(pCursorFile->assignImage(idCursorImage, 1) < 0)
{
    logTaskFailed(mLog);
    mC64.cursorMgr().close(idCursorFile);
    mC64.imageMgr().close(idCursorImage);
    return false;
}
logTaskOk(mLog);
Step 4: Save the cursor to the CDC
Cursor::save() stores both the cursor block and its associated image block. An existing resource with the same name is replaced, so the tutorial can be run again against the same Tutorial 02 archive.
// Save appends or replaces the cursor resource in Tutorial.cdc.
mLog.msg(LL_INFO, "  Save cursor to CDC ... ");
if(pCursorFile->save(OUTPUT_CDC, RESOURCE_CURSOR_CDC_NAME) < 0)
{
    logTaskFailed(mLog);
    mC64.cursorMgr().close(idCursorFile);
    return false;
}
logTaskOk(mLog);

// Close the temporary cursor. The tutorial loads a fresh copy from CDC next.
mLog.msg(LL_INFO, "  Close temporary cursor ... ");
mC64.cursorMgr().close(idCursorFile);
logTaskOk(mLog);
Step 5: Load the cursor from the CDC
The background and ship keep the names created by Tutorial 02. CursorMgr loads the new cursor by its resource name and also restores its associated image.
mLog.msg(LL_INFO, "  Load cursor from CDC ... ");
state.idCursor = mC64.cursorMgr().load(OUTPUT_CDC, RESOURCE_CURSOR_CDC_NAME);
Cursor* pCursor = mC64.cursorMgr().get(state.idCursor);
if(state.idCursor < 0 || pCursor == nullptr)
{
    logTaskFailed(mLog, state.idCursor);
    Main::terminate();
    return -1;
}
logTaskOk(mLog);
Step 6: Configure and show the custom cursor
PH_CENTER places the cursor hotspot at the center of its image. CursorMgr then builds and selects the cursor before making it visible. Each operation is checked so setup stops cleanly if any step fails.
// Center hotspot is a good default for a game-style pointer.
mLog.msg(LL_INFO, "  Set cursor hotspot and select cursor ... ");
if(!pCursor->setHotSpot(PH_CENTER, PH_CENTER) ||
   mC64.cursorMgr().select(state.idCursor) < 0 ||
   !mC64.cursorMgr().show())
{
    logTaskFailed(mLog);
    Main::terminate();
    return -1;
}
logTaskOk(mLog);
Step 7: Let CursorMgr draw the pointer
The render callback still draws only the background and ship. CursorMgr draws the selected mouse cursor automatically, so no cursor rendering code is added to renderFrame().
// Draw the current frame. CursorMgr draws the selected cursor automatically.
static void renderFrame(Image* pBgImage, Image* pPlayerImage, const TutorialState& rState)
{
    if(pBgImage) pBgImage->render();

    if(pPlayerImage)
    {
        SDL_FRect rDst = {
            rState.fPlayerX,
            rState.fPlayerY,
            static_cast<float>(pPlayerImage->getWidth()),
            static_cast<float>(pPlayerImage->getHeight())
        };
        pPlayerImage->render(0, nullptr, &rDst);
    }
}
Step 8: Update logic and release resources
A quit request exits before the next fixed logic update. Cleanup closes cursors before images because each custom cursor may own an image.
if(!bRunning) break;
state.fMouseX = mC64.cursorMgr().getX();
state.fMouseY = mC64.cursorMgr().getY();
updateLogic(state, pPlayerImage, 1.0f / static_cast<float>(iLogicRate));
mLog.msg(LL_INFO, " Close cursors ... ");
mC64.cursorMgr().close(0);
logTaskOk(mLog);
mLog.msg(LL_INFO, " Close images ... ");
mC64.imageMgr().close(0);
logTaskOk(mLog);
mLog.msg(LL_INFO, " Close CDC archives ... ");
mC64.archiveMgr().close(0);
logTaskOk(mLog);
Main::terminate();Complete source
Use the source file as the authoritative version of this tutorial.
- View Tutorial_04_Cursor.cpp
- Asset:
Base/tutorial_cursor.png - Input/output archive:
Tutorial.cdc - Log:
Tutorial_04_Cursor.log
Tutorial index